Introduction
In the fast-paced world of digital communication, mistakes can happen. You might accidentally hit ‘send’ before you’ve finished drafting an email, or perhaps you’ve sent an email to the wrong recipient. Fortunately, Microsoft Outlook offers a solution to this common problem: the ability to recall an email. In this comprehensive guide, we’ll walk you through the process of how to recall an email in Outlook, step by step.

Keywords: Microsoft Outlook, Recall an Email, Email Management, Digital Communication
What Does it Mean to Recall an Email?
Before we delve into the process, it’s crucial to understand what it means to recall an email. In the context of Microsoft Outlook, recalling an email means attempting to remove it from the inbox of the recipient. This feature is particularly useful when an email is sent prematurely or to the incorrect recipient.
Keywords: Recall an Email, Microsoft Outlook, Email Inbox
Prerequisites for Recalling an Email in Outlook
Before you can recall an email in Outlook, there are a few conditions that must be met:
- You and your recipient must have an Exchange server email account and use Outlook as the email client.
- Your recipient hasn’t read the email yet.
- The email is still in the recipient’s inbox and hasn’t been moved to another folder.

Keywords: Exchange Server, Email Client, Unread Email
How to Recall an Email in Outlook: Step-by-Step Guide
Now that we’ve covered the prerequisites, let’s dive into the step-by-step process of recalling an email in Outlook.
Step 1: Open Your Sent Items Folder
Navigate to your ‘Sent Items’ folder in Outlook. This is where you’ll find the email that you want to recall.
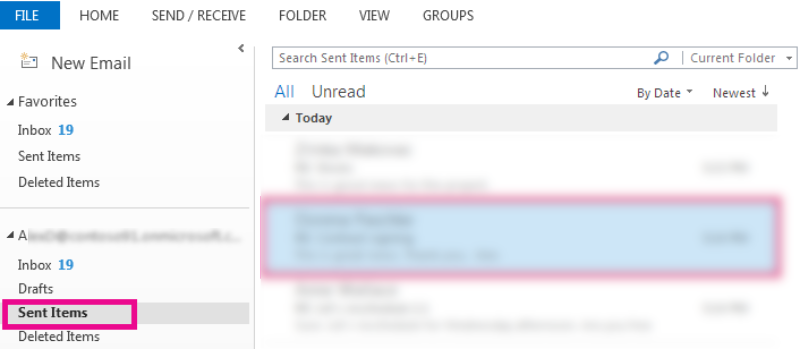
Step 2: Open the Email You Want to Recall
Double-click on the email you wish to recall to open it. It’s important to open the email rather than just previewing it.
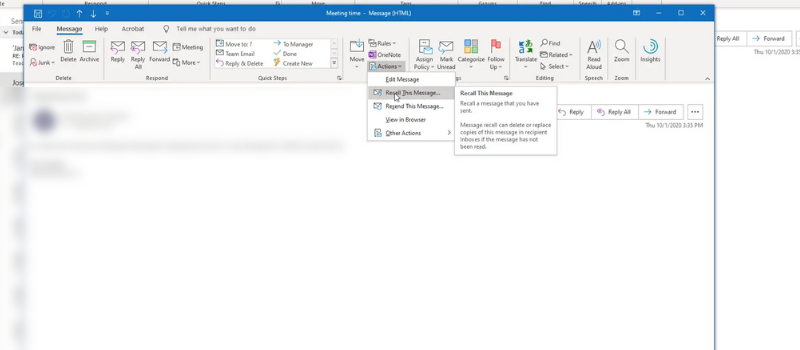
Step 3: Click on ‘Actions’
In the ‘Message’ tab, click on ‘Actions’ in the ‘Move’ group. A drop-down menu will appear.
Step 4: Click on ‘Recall This Message’
From the drop-down menu, select ‘Recall This Message’. A new window will pop up.
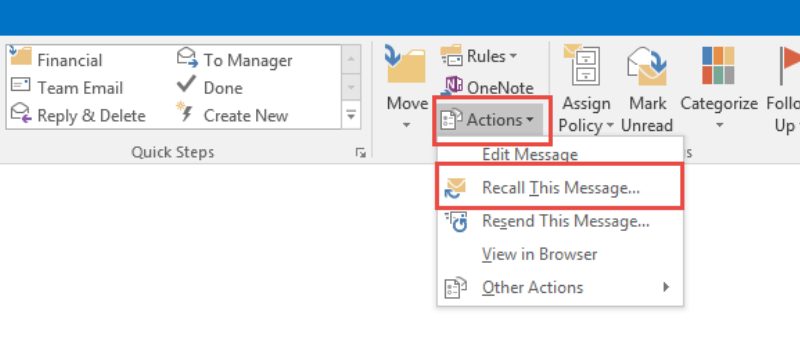
Step 5: Choose the Appropriate Option
You’ll be given two options: ‘Delete unread copies of this message’ or ‘Delete unread copies and replace with a new message’. Choose the option that best suits your needs.
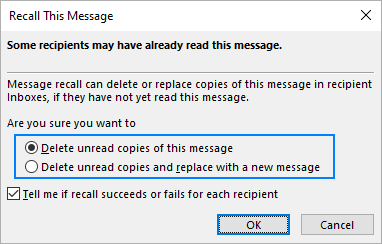
Step 6: Confirm the Recall
Click ‘OK’ to confirm the recall. If you chose to replace the message, you’ll be able to compose your new email now.
Keywords: Recall an Email, Step-by-Step Guide, Microsoft Outlook, Sent Items, Actions, Recall This Message
Limitations and Alternatives to Recalling an Email
While the recall feature in Outlook can be a lifesaver, it’s important to note that it doesn’t always work. If the recipient has already opened the email, or if they’re not using Outlook, the recall won’t be successful.
As an alternative, consider using the ‘Delay Delivery’ feature in Outlook. This allows you to schedule when your emails are sent, giving you a buffer to make changes or cancel the send.
Keywords: Limitations, Alternatives, Recall an Email, Delay Delivery, Microsoft Outlook
Conclusion
Recalling an email in Outlook can be a handy tool when you need to correct a mistake. However, it’s not foolproof and depends on several factors. By understanding how this feature works and its limitations, you can better manage your email communications and avoid potential mishaps.
Keywords: Recall an Email, Microsoft Outlook, Email Management
For more tips on using Outlook, subscribe to our newsletter.
Remember, practice makes perfect. The more you familiarize yourself with Outlook’s features, the more efficiently you can navigate your digital communications. Happy emailing!
Keywords: Microsoft Outlook, Digital Communication, Email Efficiency

No responses yet